Monday, April 25, 2011

Ham Pithiviers - Ham & Hard Cooked Egg Leftovers Put to Good Use

Easter dinner was delicious but, as usual, there is lots of ham and hard cooked eggs left over to use throughout the week.  I came across this recipe for "ham pithiviers" that I thought looked quite appetizing and coincidentally incorporates both ingredients. The recipe comes from an old cookbook of mine titled Pies & Pasties by Janet Pittman. Though featured as an appetizer, it is substantial enough to serve as an entree for either lunch or dinner. In fact, its attractive presentation makes it a worthy consideration as an entree for a party, brunch or bridal shower 

A traditional "pithivier" (pronounced pee-tee-VYAY) is a round puff pastry dessert, with scalloped edges that typically contains a sweet almond frangipane or fruit filling and is served with coffee. The dessert is believed to have originated from Pithiviers, France, however I was unable to conclusively determine the veracity of this claim.

Though primarily made as dessert or coffee cake, a pithivier is also often filled with a savory filling, as is the case here. The hallmarks of a traditional pithivier is its puff pastry crust, scalloped edges carved around the pie, a shiny top crust achieved via a generous egg glaze and a decorative design of curved lines radiating from the center carved on the top crust.

I made the pie to the recipe's specifications but added some chopped spinach and parsley to give it a bit more color and substance. I personally think this savory pie is better suited as an entree instead of an appetizer, because once you cut the pie into small wedges you lose its decorative features. The pie is quite delicious, not too rich or dry, and a great use of those Easter leftovers.

Ham Pithiviers

1 store bought package of puff pastry, well thawed
3/4 c. finely chopped cooked ham
1 T. mayonnaise
1/4 tsp. Worcestershire sauce
1/8 tsp. black pepper
1/4 c. grated Parmesan cheese (3/4 oz.)
2 T. thinly sliced green onions
1 hard cooked egg, chopped
1 T. chopped parsley
1/4 c. chopped raw baby spinach
Egg glaze:  1 egg plus 1/4 tsp. salt


Prepare filling and set aside:
In a medium bowl combine the ham, mayonnaise, Worcestershire sauce, black pepper.
Add the Parmesan cheese, green onions, parsley, and spinach. Mix well and then add the egg making sure not to smash the eggs. Set aside.


Prepare puff pastry:
Unfold puff pastry sheets (2).  Make sure they are fully thawed and somewhat soft and pliable.
On a lightly floured surface or sheet of parchment paper, roll out 1 portion to a 9-inch square. Using a 8-inch round pan or dish, cut an 8-inch circle from the center of the square. Place the circle (with the parchment paper) on an ungreased baking sheet.

Prepare egg glaze by lightly beating the egg with the salt. Lightly brush glaze around edge of circle, making a 1 1/2-inch border and being careful not to let the glaze drip over the edge.


Place ham mixture in center of circle and spread to inside edge of glazed border. Mound mixture slightly in center.  Roll out remaining dough to a 9-inch square. Cut another 8-inch circle. Place on top of ham-topped circle, stretching as necessary to match edges and deflating any air pockets. Press edges firmly with your fingers to seal.  Use the point of a knife to cut a small hole in center of top pastry. Brush top with egg glaze, being careful not to drip over edge. With a small sharp knife, make a design on the pastry using 1/16-inch deep cuts.  Do not cut all the way through dough.  Long curved lines radiating from the center are traditional, but any pattern may be used.  Now scallop the edges with the back of the knife at 1/4-inch intervals.


Refrigerate 30 minutes or longer.  Preheat oven to 450F degrees.  Bake 15 minutes. Reduce heat to 400F degrees and bake another 20 to 30 minutes (watch closely) until pastry is puffed and golden brown. Cool slightly and serve warm. Makes 8-10 appetizer servings or 4-5 generous lunch/entree servings.

Friday, April 22, 2011

Love Pasta!

Who doesn’t love pasta? No one I know. Along with bread and potatoes it completes the trifecta of my favorite foods. When I think of comfort food a plate of good penne with homemade tomato sauce flavored with fresh basil is at the top of my list. Having parents who emigrated to the U.S. from southern Italy, pasta dishes were commonplace dinner time entrees and continue today as mainstay items on our holiday and family get-together buffets. 

This classic Penne with Tomato Sauce recipe I am sharing with you today marks the debut of my food blog, Cucinare which means “to cook” in Italian. I have chosen it because it reflects a lot about how I cook – simple, fresh, lots of Italian, delicious!  It is a wonderfully simple sauce taught to me by my mother who prepared pasta with a hearty, beef based tomato sauce every week for as long as I can remember. Every Sunday morning before we went to mass Mom prepared her meatballs and got the sauce started. While at mass it would slowly simmer and be ready when we returned home.  Meat --beef or pork or a combination of the two and/or meatballs-- back then were almost always in Mom’s Sunday sauce. When my four sisters and I married we followed suit and prepared our pasta sauces in the same way. Why wouldn't we, Mom’s sauce was delicious!

As we became more health conscious the meat was eliminated and the sauce was retooled into this classic version which today remains our family’s universal pasta sauce.  The addition of fresh basil, which was not so readily available when I was young, gives the sauce its fresh and authentic Italian flavor. It’s also great as the sauce base for making lasagna or in meat dishes like chicken parmesan, or to add richness to a bean soup. Served over good penne and sprinkled with freshly grated cheese (I prefer Grana Padano) it is truly one of my favorite dishes and my quintessential comfort food. 

My recipe for this fresh sauce takes its roots from Mom’s Sunday sauce that always started with a healthy quarter cup of good olive oil to which chopped garlic, onions and a small amount of carrots are sautéed.  The carrots helped to sweeten the sauce and cut the bitterness out of the tomatoes. Cooked till nice and soft this forms the flavor base for the sauce. 

The choice of tomatoes dictates the overall texture of the sauce. Depending on both availability and preference, the sauce can vary from a smooth amalgamation to a chunky blend of ingredients. I prefer to use the 6- in-1 brand of all-purpose ground tomatoes in heavy puree. While San Marzano are the gourmet's choice, I prefer these as they are more readily available in my local markets and half the price of the San Marzano's. The 6-in-1  produces a sauce that has a sweet tomato flavor, is coarse, not chunky, in texture, and sufficiently covers just about any pasta shape.  The better the quality of tomatoes the better the sauce, but, any canned tomatoes can be used – diced, whole or crushed.  One caution is that unless the tomatoes are canned in puree, they will not produce a thick enough sauce to sufficiently coat the pasta. To remedy that, I add a few tablespoons of tomato paste.  Of course, fresh tomatoes are always a good choice but due to their sometimes high water content, the sauce may need the addition of some tomato paste as well and require a much longer cooking time. 

Fresh basil is the real secret to this sauce as it add a fresh taste and distinctive flavor. Never replace it with dried. But, in its fresh state it is extremely perishable and therefore, can be expensive. As good as it is I find it difficult to use the whole quantity I purchase before it blackens. You don’t need that much for a batch of pasta sauce so unless you use it almost every day for other recipes it will spoil on you. So in order to make the most of my dollar, I use what I need for the sauce and then freeze the rest. 

Yes, you can freeze it successfully.  Separate the leaves from the stalks. Wash, spin dry and then blot with a paper towel to get them really dry. Pack the leaves into a plastic bag and place in the freezer for later use. When the time comes, just break off a few pieces right out of the freezer bag, crush in your hand and drop into your cooking mixture. Surprisingly, the flavor of the frozen leaves is pretty close to fresh and superior to any dried basil. The frozen leaves, however, are only good for cooking. They will not reconstitute well enough to use uncooked. 

Selecting ‘good’ quality pasta makes a marked difference in this recipe. Penne is my personal favorite in terms of pasta shape. You can tell the quality by its wheat base, bite, color, texture and taste.  Good pasta has a firm, chewy bite to it, not gummy, sticky or mushy. It  should be made from 100% Durum wheat and has a pale amber color with a matte finish.  It is certainly not bland and has a distinctive, nutty flavor that blends beautifully with this classic tomato sauce. I also find that better quality pastas take a bit longer to cook. The Garofalo brand sold at Costco fits the criteria and is a good quality pasta.
  
Penne with Tomato Sauce

4 T. extra virgin olive oil
3 good sized cloves of garlic, minced
½ c. finely chopped onion or one medium onion
½ c. finely chopped sweet red pepper
½ c. finely chopped carrot
1 – 28oz. cans crushed tomatoes
½ can water, just enough to loosen up the sauce
1 tsp. salt
1/8 tsp. pepper (optional)
3 Tbsp. minced fresh parsley
3 Tbsp. minced fresh basil

Add oil to a hot 5 qt. sauce pot. Sauté onion, red pepper and carrot for about 5 minutes or till veggies begin to soften. Add the garlic and cook another minute or two making sure not to burn or brown the garlic as this will make the sauce bitter. Add the tomatoes and the water.  For a smoother sauce, pulse the tomatoes and water in a food processor before adding to pot. Season the mixture with the salt and pepper. Cook for 30 minutes or till a good consistency is achieved. The sauce shouldn’t be too watery or too thick. Add the parsley and basil. Cook for another 5-10 minutes. The sauce is now ready to pour over pasta or to use in other preparations.  This recipe makes enough sauce to accommodate 4-6 generous servings of pasta.  Delicious!


Wednesday, April 20, 2011

A Gratin of Leeks (Porri Gratinati)

Still need a side dish for Sunday's Easter dinner? This deliciously rich Gratin of Leeks pairs well with baked ham, but is best as a side to any roasted meats, like lamb or beef. The recipe comes from the beautifully written novel A Thousand Days in Venice written by Marlena De Blasi. The book tells the true story of Ms. De Blasi, an American chef and food writer, who while visiting Venice finds the love of her life. She marries him and moves to the magical island where she resides there for a thousand days before relocating to a farm in Orvieto, Italy. The story provides a beautiful description of Venetian life through the lens of a food aficionado via Venice's food markets and restaurants. 

I originally bought this book for my daughter who at the time was a 19 year old student studying abroad in Padua, Italy, a city approximately 25 kilometers from Venice in the Veneto region. After realizing the book was about a middle aged woman and more suited to me than her, I kept the book for myself and thoroughly enjoyed Ms. De Blasi's romantic love story.

As a bonus she provides a handful of wonderful recipes of Venetian inspired  dishes. This Gratin of Leeks is one of my favorites. It's quite rich so I only make it for special occasions.  It can be put together quickly and uses just a handful of ingredients. It can also be prepared a day in advance, refrigerated overnight and baked on the day it is needed.

A Gratin of Leeks

3 large leeks, dark green parts & root ends trimmed off
2 large sweet onions (Walla Walla, Vidalia, or Texas Sweet) sliced thin
2 c. mascarpone cheese (16 oz.)
1 tsp. fresh grated nutmeg
1 tsp. black pepper, freshly cracked
1 1/2 tsp. fine sea salt
1/2 c. grappa or vodka
2/3 c. grated Parmesan cheese, freshly grated
1 T. unsalted butter

Clean and prepare leeks: split lengthwise and then cut into thin rounds. Rinse thoroughly and drain very well. For added measure place drained leeks on a clean kitchen towel and pat dry.
Placed cleaned and well drained leeks into a large bowl. Add sliced onions and combine.


In separate bowl, mix together all remaining ingredients except the Parmesan cheese and butter. 
Add mascarpone mixture to onions. Mix well to evenly coat all the leeks and onions.
Place into a casserole pan coated with the 1 T. butter.  
Sprinkle generously with the Parmesan cheese and place into a 400 degree oven.  Bake for 30-40 minutes until bubbling and the top has developed a deep golden crust. 


Sunday, April 17, 2011

Pizza chena (Italian Easter Pie)

Buona Pasqua
As Easter Sunday approaches my husband looks forward to enjoying his mother's recipe for "pizza chena" the family's version of an Italian Easter Pie. I make it to honor his Italian mother and the fond memories he has growing up in a small Michigan town in a family of 10 happy kids.

A tradition throughout Italy Easter Pie signifies the end of the fasting period of Lent and mark Easter's universal themes of rebirth and renewal. There are many variations that range from sweet to savory and also differ greatly by region, city, as well as individual family.  My mother-in-law's parents were from Guardia Lombardi, Italy, a small city about 75 miles outside of Naples so her version takes its root from there.The family refers to their version as "pizza chena" but no one really knows for sure why or what is its correct Italian name. Mom's recipe is a savory version of the pie somewhat similar to a quiche but more dense and substantial.  Her version is most similar to what is referred to as "pizza piena", which in Italian means stuffed pie, and for which there are many recipes on the internet.  There are also a  number of recipes for "pizza chena" on the internet, but these are not at all like Mom's. While the filling in Mom's pies feature a mixture of eggs, ricotta, Parmesan cheese and some ham encased in a seasoned pasta dough crust, the "pizza chena" recipes on the internet contain many layers of  Italian meats, sausages and cheeses encased in a bread dough.

Of my husbands 9 brothers and sisters, only a few continue the tradition today. I think I make a pretty good version, but my husband's sister, Ann, makes the best tasting pies. Her crusts, which are the hardest part of the recipe to make, are tender and her filling is rich and creamy. The pies are highly seasoned with dried basil and lots of black pepper. Mom used lots of pepper in most of her dishes so I suspect her peppery version was a personal enhancement to the recipe.

There is a "pizza piena" recipe on Martha Stewart's website that is very similar to Mom's "pizza chena", but the recipe below comes straight from my mother-in-law and I want to make sure she is properly credited. So, come Easter Sunday my husband will enjoy his "pizza chena" along with that big peanut butter chocolate egg the Easter Bunny delivers.  Buona Pasqua a tutti!


 Pizza Chena

Filling -- make this first and set aside:
4 eggs
1 tsp. salt
1/2 tsp. coarse black pepper
1 tsp. dried basil
2 T. sugar
1/2 lb. cooked ham, diced
1 1/2 lb. fresh ricotta (the good stuff from Italian specialty markets)
4 T. grated Parmesan

Beat the eggs with an electric mixer til light, foamy and lemon colored, about 2-3 minutes.
In a separate bowl, combine the ricotta, Parmesan cheese, salt, black pepper, dried basil, sugar and ham.
Mix together till all ingredients are very well combined.
Add to eggs and mix together till smooth and set aside while you make the dough.


Dough -- essentially a pasta dough:
4 eggs
1/2 tsp. coarse black pepper
1 tsp. salt
1 T. oil
3 c. all-purpose flour

In a food processor add flour, salt and black pepper. Process for few seconds to aerate and combine all dry ingredients. 
In a separate bowl, beat the eggs with a hand mixer til very light and foamy - a good 3-4 minutes. Add the oil.
Turn on the food process and add the egg mixture through the top feed tube.
Process till dough gathers together. If dough doesn't form properly add some water if too dry, or flour if too wet. 
Turn out mixture onto a lightly floured surface and knead incorporating til dough is soft, smooth and elastic.
Form into round mound of dough. Cover with a bowl and let rest on the counter top for 10-20 minutes. This will allow the gluten to develop and produces a soft, malleable dough that is easy to work with. 


Cut dough into two pieces - one piece slightly smaller than the other to form top and bottom crusts.
Roll out first dough till very thin (do not flour the rolling surface as it will cause the dough to slide around too much). 
Line a 9 1/2 " casserole  or deep dish pie plate letting the dough overhang all the edges by at least 1 inch.

Fill the casserole with the filling and cover with remaining dough that has been rolled out in same fashion as base dough.
Seal dough with water, flute and vent the top crust. Brush the top with egg wash.
Bake in 350 degree oven for 45 minute to one hour till filling is completely set and knife inserted in center comes out clean.

Friday, April 8, 2011

Red Kale Sauteed with Red Skinned Potatoes


Greens have become an important part of my family's diet and I try to include them in as many dishes as possible to take advantage of their health benefits. Green kale, collard greens, turnip greens, rapini and swiss chard are the standard varieties I like to make. The typical way I prepare them is to saute the cleaned and chopped greens in some olive oil with a generous amount of garlic and a light sprinkle of salt. Easy, simple, delicious. If I have some leftover baked or boiled potatoes on hand, I will throw those in as well, making sure the potatoes get a crisp edge on them and become a nice golden brown. This is the way my mother used to prepare her greens and is my favorite way of serving them. It pairs well with fish or any broiled, sauteed, or grilled meat.

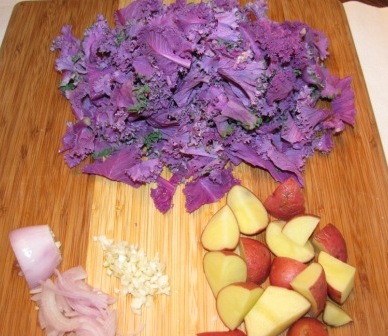
In an effort to add a little variety I came across some red kale the other day in the grocery store. Figuring it probably tasted just like the green stuff I decided to prepare in the same way. This time with red skinned potatoes to complement the red color of the kale. Sauteed with some garlic and shallots and then finished with just the tiniest drizzle of balsamic vinegar this made a delicious side for my grilled tuna dinner. Surprisingly, the red kale has its own distinct flavor. Not altogether that much different but considerably less bitter, in fact, sweet, and much more tender than its green counterpart. Quite delicious and a veggie option I will consider more frequently.


Red Kale Sauteed with Red Skinned Potatoes

1 bunch red kale, thickest spines removed & coarsely chopped
4-5 small red skinned potatoes, quartered
2 cloves garlic, minced
1 shallot, chopped
2 T. olive oil
Salt & pepper
Light drizzle balsamic vinegar

Place potatoes in a saute pan with a small amount of water. Bring to a boil, cover and cook 10 minutes or less till potatoes are fork tender, not too soft. Remove from pan and set aside. Clean saute pan and dry thoroughly.  Heat pan and add 2 T. olive oil. Saute cooked potatoes on medium high till golden brown. Add shallots and garlic and cook till shallots just begin to softened being careful not to burn the garlic.  Add the chopped kale, sprinkle with a little salt and pepper. Add 2-3 T. water. Combine all ingredients, cover, keeping temperature around medium high and steam the kale till spines have become tender and most of the water has cooked down. Remove lid, drizzle with a very small amount of the balsamic vinegar, stir together and serve. As a side dish, enough for 2-3 people.